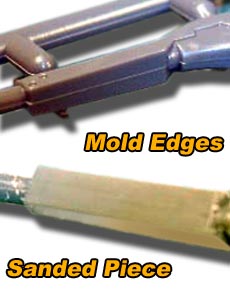
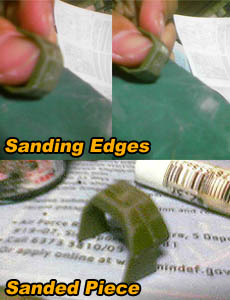
26.3 C
Singapore
Saturday, July 12, 2025
Home Blog Page 147

Tutorial: Introductory plastic kit-modeling – Priming & painting

3
Tutorial: Introductory plastic kit-modeling
Kit Modeling tutorial article table of contents

The School of Thoughts
While most amateur modelers simply just smack together all pieces & paint later, this is not the recommended way as you eventually have to disassemble the model again to paint those hard to reach places. If you plan to model, you must model your plan. In the general school of thought here are 2 styles of painting:

Plastic kit modeling painting

1) Paint while to parts are still attached to the parts plate, i..e paint before doing the steps mentioned on the previous page (usually for spray painting, etc)

2) Paint after all the parts are removed & sanded.

Personally, I prefer the 2nd approach. Considering that I am not blessed with expensive spray guns & compressors, not to mention the costly paints which comes with it. The 1st style is definitely faster for mass painting & allows you to apply a more uniform base coat. Followed by the cutting process, a simple sanding & paint touch up & the part is ready.

Moreover, the chances of part loss is lower as you do not need to handle each part to paint one by one. This however, do not hold if your model requires unique colours for each part contrary to one colour throughout, this is where style 2 shines.

For the casual modeler using the 2nd school of thought, I recommend using bottled acrylic paints you can find in your local hobby stores or shopping center toy departments. They usually won’t cost more than $4 per bottle. For painting larger big surfaces I will recommend acrylic spray paints (usually $7/can). Use spray paints sparingly or when there is a need to paint many pieces of large flat surfaces at ago, you do not have much control over the delivery of the paint as compared to an airbrush.

With sprays aside, now I will touch on the most basic tool for painting- brushes.
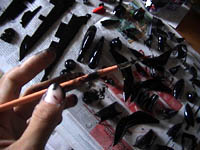
Brushes
Expanding on the list of required brushes for painting, they usually come in measures on inches, usually I will recommend a mix of thick flat ones for painting large parts with ease to the more frequently used medium width, to a collection of fine brushes for detailing and panel lines.

Plastic kit brushes chart

As illustrated above:

– 10/32″ Large brush for large surface painting & base coating.
– 5-8/32″ Small-medium surfaces, minor detail, moderate small pieces
– 1-2/32″ Fine panel outlining, screws, lines & misc detailing
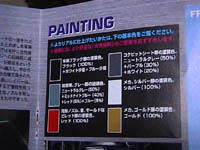
Plastic kit modeling colour key

The Colour Key
Included in the main assembly manual is usually a specifying all the required colours used for the model on the default scale. Do note that not all paint manufactures make all types of colours & most of the time you have to mix colours to achieve custom colours, usually defined in the colour scale at given percentages (e.g 30% white/silver, 20% blue on top of black for a shade of cool blue metal). The basic universal colours are usually black, white, gunmetal & silver for Mechas.

Do note too that each offered colour usually comes in glossy & flat (matte) variations. Glossy paints are usually for finishing, automobiles where the desired smooth shine is required. Flat paint are usually for machine parts, miltary machines where a more “worn out look” is required. Flat spray gun paints are very good for producing burnt/stains marks very well too. You can mimic that with the given spray paint as well, but not to a controllable degree.
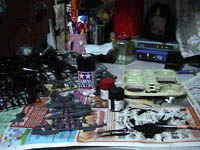
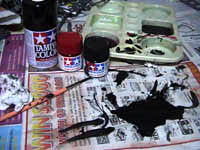
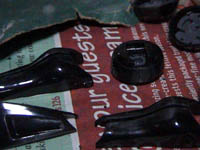
Plastic kit modeling painting

Workplace
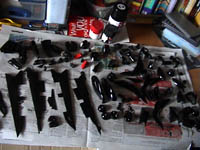
Painting can get really messy at times. If you do not have a dedicated workspace for modeling, its best to have a big flat surface or desk preferably with the usual newspaper not only to prevent work table staining, but a good absorber of spills, etc. Little items like a palette, brush water cup & dampener as essential as well. Have another open area for you to organize & place your painted parts so as not to misplace them & helping in part organization as well. This beats the worst thing – encountering missing parts during the assembly phase.

Priming
Priming ensures better adhesion of paint to the model surface, increases paint durability, and provides additional protection for the material being painted.

Also considering the painted surfaces being plastic, paint do not stick as well to such smooth, non-porous surface unlike paper or wood. Thus using more paint to even out the finish, which is not economical because it’s more expensive than primer.

Therefore, this required step as it adds a thin layer between the paint & actual plastic surface so if the need be to remove paint using thinner, etc this can minimise damage to the plastic surface though mildly but considerable extent.

In addition to sealing the surfaces, good primers will also cover different textures like the difference between your rough sanded plastic. This is critical if you’re using higher-gloss paints which tend to show those differences and imperfections more than flat paints.

Plastic kit modeling painting

Moreover, another benefit of using a primer is that it provides the finish paint a better bonding surface so it sticks to the base material much better.

Apply primer only to surfaces to be painted & avoid applying any (together with paint) on the insertion pins where the parts mesh together (to ensure part fit). However, with this in mind, do bleed primer edges by overlapping primer edges over the desired actual painting borders. Apply primer thinly & evenly & give about 5-6 hours to dry completely.
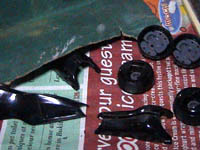
Base paint coat
Acrylic paint can usually be applied direct on top the primed plastic without mixing with water. But for base coats, a 70% paint 30% water ratio is safe to quickly & effectively apply the base coast without much loss in quality.

Plastic kit modeling painting parts

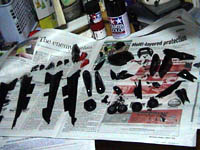
Leave the base coat to dry for about half a day in an indoor environment avoiding direct sunlight or your paint will end up appearing cracked or chipped when dried faster than their intend drying time (aka ‘superdried’).

Plastic kit modeling painting

Secondary paint coat (optional)
When done, inspect the pieces for surface finish. This step is mainly to make the surface flat & even, ready for the finishing coat.

You can skip this step if the surface is already of desired finish. Otherwise, using a brush, overcoat the affected area with strokes overlapping the entire area, this is so to prevent obvious “patching” visible when only fixing a specific spot. When dried the paint will eventually blend together with the existing base coat.

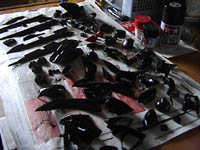
Finishing (fixing) paint coat
I usually use 100% paint for this step for the nice locking thick coat without water, thus achieving a consistent uniform coat for a spectacular finish. Take special attention to this especially when painting the the largest external & visible surfaces of your model.

Plastic kit modeling painting setup

Points of Note
When leaving out to dry on newspaper, avoid placing large flat surfaces on the paper directly as upon drying the newspaper will actual stick to the part surface, leaving you with an additional tough job to clear out the grime & retouch-up/paint the surface. If need be , prop up the part on the newspaper using support stands savaged from the part plate arms.

General brush strokes involves a single uninterrupted stroke on one surface from one end to another, just like how a bubble jet print head moves, one end to another. This is also to prevents paint gaps in between surfaces. As usual leave for half a day for the finish coat to dry.

Painting Summary
As it goes, in summary for this particular step:

  • Priming
  • Base paint coat
  • Secondary paint coat (optional)
  • Finishing paint coat

Next I will cover on detailing over your newly painted surface.

Tutorial: Introductory plastic kit-modeling – Model preparation

0
Tutorial: Introductory plastic kit-modeling

I kit model as a personal hobby, I particularly like assembling mechas and vehicles. Besides getting down & dirty, the past time involves the combination of ones patience, skill, tool handling, let be painting or adding details to produce one-off models unique to a modeler’s wants and imagination.

Kit Modeling tutorial article table of contents

Kit modeling, the basics
There is always a kick to building models, that is why most modelers simply can do upon completing one is to admire their creations for a while, just to pad off to the store and start off another kit once they are done.

One of the most rewarding experiences this hobby gives is not only the satisfaction you get upon final completion, but the value appreciation of the model kit over time, particular rare & collectible models. There a large collector’s market & auctions for such model kits & they can really fetch good rates for their creators. Otherwise, for most casual modelers like me, modeling as a general hobby is to past the time.

This tutorial is written primarily to serve as a guide for anyone who wishes to get on the kit-modelling bandwagon. Do note that there is no “fixed steps” to modelling & this tutorial reflects my own style & practise. Different modellers have different procedures themselves, but are very much similar in one or anyway eventually.

The test subject
The model I will be using is a Mecha from one of my favorite 80s anime & manga series of mine- Patlabor. It’s a Japan made Bandai MG (Master Grade) plastic injected model type J-9 Griffon combat prototype labor. Like most master grade models it spots additional fixtures like a detailed cockpit & an eye for details usually not seen off the standard off-the-shelves 1/60 sized models.

This is a general claim though & the end result usually depends on the modeler’s skills & experience in the field as well. There is also the added flexibility to assemble the model in various configurations as well (in this case with cockpit open, pilot or jet accessories).

Some Terminology

I may use these terms in and out throughout the tutorial, to prevent confusion & maintain consistency:

Parts plate: The injected plastic plate holding the various pieces by thin arms (injected molded frame part holder)Rubber Plate: Similar to part plate, but for rubber parts

General inventory & Tools of trade
The basic modeler’s kit should have the following tools:

  • Scissors
  • Modeller’s knife
  • Paintbrushes (Generally L/M/S Sizes)
    10/32″ Surface painting
    5/32″ Minor Detail, Moderate small pieces
    1/32″ Fine Panel Outlining
  • Detailing Markers (Gundam Markers or Mitsubishi Pencil Uni Fine all
    marking Paint Markers)
  • Sandpaper, Fine
  • Mini Fine/Spectacle screwdriver set (Varying Diameters)
  • Small pair of Pilers
  • Paint Pattelle
Plastic kit modeling box contents
Plastic kit modeling box

Other items include the acrylic paint with colours based off the model sheet’s recommendations, you can also of course, mix paint to achieve a varying array of colours to offset from recommended colours if may. A compressor driven airbrush is a nice-to-have luxury item, which is very good for the ease of detailing & painting surfaces.

Organising & preparing the pieces
It can be quite difficult to track cut pieces after you’ve separated them. Furthermore with MG models spotting over 5-8 different parts plate, it’s a good habit to organise your parts using what else but the packaging box itself! Using separators, place them inside their own individual compartments. This too

Cutting the pieces
One of the first steps in kit modeling & separating pieces from the the plastic injected molded frame part holder.

Plastic kit modeling
Points of Note:
Take caution when handling the modeler’s knife, modeling paint & cement could be toxic & avoid contact with wounds if may.

Breaking off the pieces
Its a good habit to first use a pair of Scissors to cut the parts off the parts plate, giving some allowance & leaving about 1-2mm of the plastic connector (spure) studs still attached to the piece. Avoid cutting too close to the part as due to the shearing nature of the scissors, you might actually remove some plastic material off the needed part itself., which will require additional cement/putty filling & drying of holes which will take a considerable amount of additional time. This might also affect eventual surface finish if not smoothed evenly.

Finally, using the modeler’s knife, cut of cleanly, the plastic studs sticking out of the part itself. A smooth finish is essential especially at points where 2 pieces mesh/connects together, thus ensuring a tight seamless fit without any gaps.

When you get the hang of it, you can use the modeler’s knife to remove all the parts instead of the Scissors, as it beats having to change from 2 tools over & over again (esp with over 200 parts!). Remember to remove only what you need at a go, or compartmentalize what you’ve cut out so you will not risk mixing or losing any pieces.Mold lines (Shown right)
Present in almost all model kits except vinyl. Plastic is no exception, this is a manufacturing “defect” which is necessitated by the design of the mold or the way it can be economically molded at the factory. It is usually nightmare having to rid off off every piece, otherwise parts won’t fit or mesh. To remove these lines, using a modeling knife, simply scrape at the mold lines till they are flushed with the desired surface. Then use a sandpaper to smooth out the eventual part.Sanding
Finishing won’t be as good after the primary part removal & stud cutting, therefore the much needed step to sand your parts. Using fine grain sand paper (plastic/metal type is generally acceptable).

As the J-9 Griffon is mostly black, I will be illustrating this on the right image I took when sanding another one of my other plastic models with an olive-green colour to show the discolouration & eventual sanded piece.

Do not worry if your part appears whitened or scratched after the sanding process as it will be covered by paint or a finish later anyway. Cheaper models will usually have the “whittening effect” with the sand paper grains sticking on the part itself, this is also dependent on the type of plastic used for molding. MG models will have lesser of this “smearing effect”.

All defects however and thankfully, can be removed by just simply dusting them off before priming & painting, which I will be covering on the following page.

Plastic kit mold edges and sanding
Plastic kit sanding edges

Article table of contents

Google Adsense? more like Senseless Cheats

1

I recieved an unexpected email from google recently stating the termination of my google-adsense account. After displaying my ads for about half a year, I’ve made a total of $300USD since then, no idea how such ads can generate so much cash by just putting them up on the site. They sent me a letter to comfirm a pin so that cheques can be emailed & when I was just awaiting my first ad cheque on the 1st paying month, to my astonishment and without warning, google left me an e-mail, disabled my account, taking all my MONEY with them.

They stated that I’ve violated the adsense terms of services in a typical standard computer generated email, reason being neglectably & sweepingly general:

…It has come to our attention that invalid clicks have been generated on the Google ads on your site(s). We have therefore disabled your Google
AdSense account. Please understand that this step was taken in an effort to protect the interest of the AdWords advertisers.
A publisher’s site may not have invalid clicks on any ad(s), including
but not limited to clicks generated by:

  • a publisher on his own web pages
  • a publisher encouraging others to click on his ads
  • automated clicking programs or any other deceptive software
  • a publisher altering any portion of the ad code or changing the
    layout, behavior, targeting, or delivery of ads for any reason

Publishers disabled for invalid click activity are not allowed further participation in AdSense and do not receive any further payment. The earnings on your account will be properly returned to the affected advertisers…

Later do I know after asking around, that’s the same email everyone receives upon reaching their pay release date & if anyone who falls under the category of generating “invalid clicks”.

I didn’t do any of those illegal acts listed in the letter, google didn’t even send me any form of a notice, warning at all of what actually went wrong which caused the invalid clicks, they didn’t give me a chance to explain my situation, not even a single one. Its just terminate, blacklist my account & make off with my money…

This definitely undermined by impression on Google now, as a professional internet corporation. And man do I feel betrayed now, I always partonised google by promoting & offering google searches & this is how they repay me? I wonder do they actually return the money to the advertisers, or do they just eats it all themselves? Anyway, if google is so “transparent” is terminating & hiding from publishers, they definitely have no obligations to hide from advertisers actual impression counts too.

I hate being exploited, I miss the good old days of excite.com, altavista & yahoo… even before Google existed – grown to a big fat giant with too many “ooooo” to spare. Well done Gooooooogle…

Now to change the start page of all my computers to Yahoo.

Standard Chartered Marathon SCM 2006 Details and Shirt Sizes

0

Standard Chartered Marathon SCM 2006 Mega Update
Been recieving quite alot of enquiries regarding SCM, especially about the sizes for SCM singlet & Finisher’s Attire. So I’ve included an official measurement chart for both the singlet & finisher’s shirt size measurements.

Personally from my last year’s attire, I wear an M which is quite a good fit for the singlet, finisher’s tee also have the very same dimensions & fit. Otherwise L is the other most suitable for most gentlemen looking for a more baggy feel. For the ladies, there are ladies sizes as well, with the respective sizes average about 10 less in chest width per respective size.

SCM 2006 Official Shirt Size Chart:

SCM Shirt Sizes

For a more “hands-on” comparison if you ran last year, the attire is very much similar to that then, as adidas is still the apparel sponsor for this year’s marathon.

Also if you were at the SCM event launch last July at the Raffles Place Park, there are quite a few runners wearing the same blue singlet with SCM 2006 on it, so can be very safe that the singlet this year is of the same make & cutting.

SCM 2006 Registration Fee Schedule:

SCM Shirt Sizes

SCM 2006 RaceDay Schedule:

Event Distance Flag off time
Full Marathon 42.195 km 6.00 am
Half Marathon 21.1 km 6.30 am
10 km – Men 10 km 7.00 am
10 km – Women 10 km 7.30 am
Kid Dash 750 m 10.00 am
Wheelies 10 km 10.15 am
Team – Men 10 km 7.00 am
Team – Women 10 km 7.30 am
Team Marathon – Mixed 10 km 7.00 am


SCM 2006 Running Route:

The route is similar to that of last year but with more waterpoints stationed 1.5km apart.

And if since you are running already, why not Run for the Handicaps Welfare Association (HWA)? Its for charity as well!

Help HWA GO THE EXTRA MILE for the physically disabled by helping them enhancing their lives and enabling them to integrate into society. We need to mobilise 250 runners participating in SCSM 2006 to raise funds for HWA. Each person counts…ask your friends, family, relatives, neighbours, colleagues and kakis to join in the run and raise funds!Target amount: at least SG$50 000

GO THE EXTRA MILE for HWA. It’s Fund Raising & Fun Racing!

Current Running for 42km:

Pohfong, Zul, Elrick, Darren, Shaun

Current Running for 21km:

Alec (Yoke Tai)

Current Running for 10km:

Poh Loong, James, Yuan, Huida, Zhongyuan

Army Half Marathon Race Report

3

Just woke up at around 5pm after sleeping the whole afternoon upon reaching home, of course definately after lunch, a nice warm bath. Found time to blog, amazingly recovery is very fast this year no more sore feet & wobbly legs now, can even jog & jump about. Unlike the aches last year lasting even 2 days after raceday, I think my skin getting thicker too…

💡 Pre-Race
Had dinner the night before with the Plowman family at Kenny Rogers Marine Cove, East coast. Had their half chicken & ribs platter with side servings of marconi & cheese, long beans & mashed potatos, good carbo. The catch is that we stayed & chatted after dinner, then went for a walk along east coast park before calling it a night (11.30pm). Then my parents had to fetch them home before picking Sheena & me thereafter. Slept at around 12.40am so technically only had about 3 1/2 hours of sleep before waking up at 4am again.

Breakfast was at a hawker center opposite bras basah, beside Apollo hotel. Parked around the arts hertitage building area & walked there for some mee sua soup & teh-o.

Reached the padang with annoucements of the race starting in 5mins. & the race actually flagged out after I deposited my baggage. Baggage collection was unlike last year, no dark 5-tonners & was actually good this year. I was expecting a tonner dump again this year thou, coming with baggage tag already attached & choosing the brightest & most outstanding orange colored bag for spotting. Till they told to put my bag in plastic bag (presumably to prevent lost or tempering of belongings) which caused a minor hassle to reattach the tag, credits going to the helpers there who helped in re-attaching my tag too, yea good.

Did a rush warm-up & stretch, intending to warm up on the run. The esplanade bridge was actually clear when I was there, competitive had been flagged off. & non-competitive gathering unlike the packed bridge last year. Nevertheless flagging off with the bulk of the crowd didn’t prove too good either as it’s too packed to speed up. The race had started…

AHM Bib

Pacing is very hindered this year, the first 4km was the worst spotting 6.30min/km pacing even with mindless weaving & cutting in and out of the crowds, still can’t speed up to my optimum 5min/km pace. Just too crowded as one lane is closed most of the route, like running squeezing through a funnel. Finished at a disappointing yet satisfying 2:08, inclusive of my toilet break, waits at all the traffic lights & after removing my champion chip at the finish, so actual timing may actually be lesser, but off my aim of at least 1:50mins. The widest & best over taking part has to be east coast park area & nichol highway area though.

Saw SGrunner sotong around mid-race & kept up with the tower before having to answer big nature calls at a petrol kiosk (guess with so much comments on shitting in pants thing over last week’s NBRR). Never do I know can see him again at outram MRT, talking to tiwazz who had problem with cramps. Too bad it was too packed jog over & say hi, I passed & overtook the group. Jonathan bumped into me before outram around riverside hotel.

Talking about toilet break having cleared my bowels the night before & right before the race, I never see myself coming to an urge halfway through the run. Maybe its the crazy toilet crowds at the east coast area which brought that to mind, together with the very bowel inducing motions running can give to your body. Held to my guns till past fort road where I couldn’t hold & detoured to a SPC petrol kiosk, greeted by a very friendly uncle who pointed the direction to the kiosk’s toilet upon approaching him, it was clear & even had Toilet Paper! Saved! It was a quickie, just like F1 pitstops, left the cubical only to be greated by a long queue of runners waiting in line, whew!

6Div water point seems to be the nicest, the one along nichol highway, with tribal fire theming, water, cheers & spray points. I guess the only things I have against this year’s event are the ultra small marker signboards, the need to STOP at almost every traffic light!, esp at the bugis, SMU & cantoment area. Irritating! Moreover, at some water points, you have to open the Isotonic drink packs instead of them being race friendly, so didn’t touch any isotonic drinks this year at all. Where GATORADE this year!??

😛 Post Race

Last & present year AHM finisher medals

The true efficiency of the baggage collection shines after the race, after a long time too! Beside a wide use of post-it notes, my bag actually took 2mins to arrive & we get to keep our tags at the end too. Commended about that to the bag depositers who were rather pleased with their job too. There isn’t much of a queue when I was there too & even if so, was fast moving. Thumbs up!

Met Darius & Jonathon at the war memorial where we rested stretched & hydrated. Milo was nice & cold too, courtesy of few Milo Trucks. & I have the luxury to camp there for freeflow before the truck is turned upside down by the 6km & 10km crowds thereafter.

It rained halfway throughout the 6 & 10km races, therefore no no SGrunners phototaking. The rain proved much to my parent’s dismay who caught the rain mid-race too & wet parking coupons. Goodie bag queues were freakin’ long, lucky competitive already collected ours at the race-expo.

Met up with the rest of the track team under the esplanade bridge hearing tales of being the last of the competitive runners & the herd of non-competitive runners treating to engulf them alive. Also heard of runner shitting tales, drip & medical tentage tales courtesy of Weijian. Interesting. Those who also ran & were there: Darius, Huida, Weiwen, Yiying, Shunqiang, KC, Yuan, Zhongyuan & Alec.

Medals this year looks cheaper then that of last year (doesn’t have the nice dark faces as shown) but still same solid. Registered for Swissotel Vertical Marathon 06 at the padang booths, beats mail-in & fax registration ($29 early bird price, $39 usual), Trackmate Alex won’t be running for it this year though considering since last Suntec Vertical Marathon this year, but as usual Ahlong is going.

Piggin’ out before Army Half Marathon

0

Updated my long lost friendster account after like god knows when!
[ http://www.friendster.com/shauny ]
Nothing much just new photos, but we can have 50 now! ooooo! Last time was like only umm 3?

Preps for AHM
Mmm tomorrow will be 21km day, just a little more than my usual 15km jog in the park. Up-ed my Mp3 player with a playlist full of smooth songs for a relaxing start & head-banging techno & trance in the 2nd hour to push up the pace to finish. Different song specifies & plays after a certain elapsed time so I know my race pacing throughout the run. Aim to finish in 1hr 50mins, 10mins better than last year’s 2hrs flat. Purposely cut all songs after 2hours, a motivation to finish earlier or NO MUSIC! Also to finish before 8am to see my friends & parents off running the 10km.

Dad (aka the alarm clock) suggested dragging me to bras basah for breakfast where he claims a 24hr coffee shop exists, as most hawker stores near my home at 4.30am tomorrow won’t have food prepared by then (Mmm but I remembered eating near home last year?).

SGrunners, enjoy ya carbo-loading later tonight, sorry I can’t make it. For me, will be Mmmm, fat-loading (Triple Fold FAT BELLY!) for AHM at Kenny Rogers later for Dinner with the Plowman family- Mum’s old friends from England & my family’s hosting the treat!

TTSH today, AHM Tomorrow

2

Come on people! 18k hits a day & not a single comment for days? wahh maybe I should increase the comment link font size….

Visited the doctor at Tan Tock Seng Hospital today with regards to my potential leg problem
. You see my lower leg have this slight abnormal curve in the bone & if left uncorrected can lead to uneven wear on the knee due to uneven loading the leg gives. Just imagine like pushing down on a tilted stick on the ground with the face of your palm, naturally one side feels more loaded than the other, so thats the analogy.

It can however, be corrected easily with relatively minor surgery, preventive surgery you would say. But without of course spending like 6weeks on the wheelchair if I choose to operate on both legs at a go, rather than one at a time which can actually take twice the time before I am done. Amazingly from the X-ray, the doctor said my knee is perfectly healthy & a-ok even given this case of “bowing”. Normally its always people who have knee pains or discomfort relating to my case when they would actually see the doctor to be fixed. Yes, preventive surgery for me you would say again, better to be safe than sorry.

Recalling, the clinic was relatively empty today & I was the last of the morning batch, so waited like a short 10mins before I was attended to. Haha the doctor was kinda nice, not to mention to chat too, Dr Yagappan or something. He specialises in Sports Medicine specifically in orthopedics (the). Yes so he can very much understand (on the same sports channel frequency) the pain & rigours what we crazy marathon-ers do to whack overselves crazy before crying back to momma.

Was told he’s gonna transfer to Mount Elizabeth’s end of year, so if it will cost 2 times to operate under the private sector. Otherwise he suggested operating under one his fellow doctors in Changi, with subsidy (Bringing price to $7000). Also specialising in wedge surgery. Moreover, there’s a chance he can come back as a consultant in TTSH next year & he can operate under government as well.

Then casually he told me: “if I am your bro’da I will tell you to ‘scram’ right now cause there are so many other people with problems worst than you”. Seldom would anyone in such good physical condition come & have the choice to operate, as almost all his patients don’t even have a choice. But generally he told me no rush for surgery, as theres no pain whatsoever, don’t miss any semesters or let this disrupt my studies & maybe find time out after I graduate to fix myself up. Anyway he told me I can call him or the hospital direct if there are any urgent matters pertaining during this period.

Important, but not urgent I can say.

Left the doc’s only to see a feaking packed waiting area thereafter, gosh I actually camped in there for 20mins? Dammit must not be so talkative next time….

Dell Laptop Use Banned From Qantas Flights

0
No Dell Laptop Usage On Qantas Flights

New Qantas regulations make it clear that no Dell laptops, not even those unaffected by the battery recall, are allowed to contain batteries while on the plane. That means nada usage while your fellow flightmate beside you happily go tippy-tappy on their Vaio with the same defective battery.

Apparently as we all know, the Dell batteries that were recalled were all Sony manufactured batteries between specific manufacturing dates. Sparking not only the greatest cheers & party poppin’ from HP & Gateway, but also Dell’s record setting biggest recall of 4.1 million laptop batteries worldwide. But Dell is not the only other company to use these batteries, Dell also uses at least 2 other non-Sony suppliers for their line of notebooks.

You very own combustable pack of li-ion, only found in a Dell.

While Sony gets their own fair share of flames from their own medicine recently, the defective batteries are almost everywhere & not only arrowed on Dell. Cool Sony, you gave the world the walkman, now dual usage laptops which can also serve as BBQ fuel. What could be coole- umm… hotter?

But Qantas are blind just to ban Dells, or to even consider it. The FAA has evidence that if it does go up in flames, it will not bring down the plane & neither has plans to Ground Laptops. Well unless you are deliberately starting a 30 USB port BBQ, or the sudden interest of laptops by middle east men.

I do not own a Dell notebook, but this form of technological discrimination does not look good & will definitely lead us to nowhere. Well one can always print one of those Gateway or HP stickers & just smack them over the Dell logos, airport staff can’t tell the difference anyway, neither the difference between a salad & dessert fork.

Mmm, what could be lamer than Snakes on a Plane? Dell Laptops on a Plane? Bwarregh!

Related Article

Even Laptops hidden in Cars not safe in Malaysia

0

Story: Malaysian laptop thieves using mystery gadget to pick which cars to break into.

Car Break in

Presumably exploiting RFID scanners to detect those RFID tags/stickers normally placed onto the bottom of laptops containing serial/model numbers &/or li-ion batteries for computer assembly & manufacturer identification purposes.

For ya people intending to head up north with ya lappies. The best is to carry it with you, well that will solve this problem, but won’t guarantee physical in-person robbery & random parang assaults on the streets though.

Read more on Related Source on Engadget

Terry Fox Run 2006

0
Terry Fox Run 2006

Hey all tracksters, heres an update of an upcoming event during the SP semester holidays, the Terry Fox Run 2006– The Run For Hope.

Event Date: 17 sept
Time: 8am
Venue: Sentosa Tanjong Beach
Fee : S$25 for adults
Dist : 9km (competitive), 5km (fun)

I will most prob take the relax-jack 5km haha & maybe chill out at the beach for the rest of the day. Feel free to leave any comments on this & the plans. For registration, take note that it must be done in person at the following:

1. The Regent Singapore
One Cuscaden Road,
Sept 1 – 16, 2006
11 AM – 8 PM daily

2. Singapore Cancer Society
15 Enggor St.
#04-01 to 04 Realty Centre
Sept 1- 16, 2006
9 AM – 6 PM (Mon -Fri)

3. Borders
501 Orchard Rd.,
#01-02 Wheelock Place
Weekends – Sept 2,3,9, 10, 16 from11 AM – 8 PM
Weekdays – Sept 11 – 15 from 5 PM -8 PM

Further 2006 Event line-up:
2nd Link Bridge Run 06Swissotel Vertical MarathonStand Chartered Marathon

Last Semester Paper, Benq-Siemens p51

1
Lessons, lessons

Wahhaah still have one paper to go on friday & already in holiday mood. Haiz haiz must restraint, RESTRAINT! Only few more days, put in the effort for the last Thermofluids II paper & whoa! Then the holiday anvil can come lose on me full time anytime.

Moreover, though I find the Thermofluids kinda dry & boring it’s our lecturer Mr Pawa which makes the lessons very interesting, if it’s not his open nature for exam consultation, its his astonishing relation of our dirt dry lecture notes to practical real-life aspects. Not to mention his professionalism in teaching, just such of the very few rare lecturer breeds I came across in my course of Mechanical study. Simply just motivates you to score & ‘A’ grade just not for yourself, but also for who your teacher is. *Locks self to room & devour more dual combustion & rankine cycle theory*

Gadget Talk
Nevertheless, almost put aside my quest for the perfect phone as there seem to be no puurfect phone around, even the Sony Ericsson P990i & Dopod 838 Pro don’t appeal to me, just when I thought I have to survive with a dinky Nokia 7250i for months to come, the BenQ-Siemens P51 came along:

Benq Siemens p51 phone
Benq Siemens p51 Side
Benq Siemens p51 Camera
The Benq-Siemens p51 specifications

  • GSM (850/900/1800/1900 mhz) & GPRS (No UTMS)
  • WM 5.0 OS Phone Edition (With AKU2 Push E-mail)
  • 2,83″ TFT QVGA display (240×320 pixels @ 65k colors)
  • 1.3MP camera with flash
  • 128mb RAM & 128 ROM
  • QWERTY- Keyboard
  • GPS-module SiRF Star III
  • FM Radio (Unheard, but stated on offical website)
  • Bluetooth (Version not stated yet)
  • Wi-Fi (802.11 b/g), Bluetooth & USB
  • 2.5mm Audio Jack (yea!)
  • Full Sized SDIO/MMC card slot (yea!)
  • SMS, MMS & E-mail
  • USB Sync & Charging
  • Li-Ion battery with 1370 ma/h capacity
  • 240 minutes (4hrs) talk time
  • 150 hours stand by
  • 122х60х20 mm
  • 170 grams

It seems to have everything I need, well for at least about 2 years ahead. Till it starts giving the usual glitches & battery wear. Till then, I don’t really need 3G UTMS as firstly its too expensive, secondly it’s a battery drain & thirdly even if I have one, who am I gonna video call? Almost anyone I know who own 3G phones presently still run their 2.5G SIM cards internal & amazingly it’s a norm here in Singapore. Even those with 3G sims hardly use UTMS & definitely they won’t wanna run unnecessary 3G video calls either.

Benq Siemens p51 GPS Reciever
Benq Siemens p51 SDIO/MMC Slot
Benq Siemens p51 Keyboard

Camera-wise, since I use my phone camera mainly for web-based photoblogging for the site, 1.3MP is more than enough for me, though 2MP is the norm now. In fact I will most probably see myself shooting Max quality VGA (640×480) most of the time.

The 2.5mm stereo jack problem could be easily settled with an adapter for 3.5mm headphones, which can be found in many SimLim audio shops & its beats attaching an adapter found in many phones extending the device length by inches at ago. Otherwise, the FM radio function is very much unconfirmed on various mobile review sites, except being briefly mentioned on the official site itself (which do not seem credible at this moment of time). The GPS function is definitely cool for driving & in my annual adventure races, not to mention having to carry only one device for photos, PDA & phone for trips (contrary to 2 devices I carry everyday now).

Full-sized SD slot allows me to use large capacity & cheaper 4GB cards for large GPS maps & music/videos. Just throw in USB host support to top it up & it can just hit the sweet spot just great. Expect it to cost around $800SGD & below it being a GSM quad-band only phone, so prices will definitely be lower.

Benq-Siemens p51 Official Site

New Balance Realrun 2006, AHM 2006

2

The Newbalance realrun was on yesterday (Bib no. MO1959). In the mist of all the sunburn we’ve got from the sea water, tanning oil & a good sunny weather. Now all red like overcooked lobster… Yea, but it was cool, literally…

Quote from alec’s blog: “….I am sunburnt = very very red…”
NBRR 06

This year’s crowd was smaller than last year’s (presumably because of Sheares Bridge run 2006 next week), with the opens crowd not even up to the gatecarpark entrance (the slope with cars parked leading to the merlion behind the start line), as opposed to last year’s crowd. But nevertheless a respectable crowd is still there which resulted in a very slow start. It took like 3.3mins after the horn to actually cross the start line! wah next time start in front lol. The start is where its packed the most especially the satellite circle & I was really delayed off my usual running pace at the 4km mark – too many people & very difficult to overtake. Nevertheless, I really appreciate water points, not for drinking but crowd control as everybody rush to the sides for water, there will always be a nice center clear path for me to speed up catch up with my pacing.

New Balance Realrun Sgrunners

Besides relying on pure power to overtake on uphills, the other overtaking spree is always at the sand part, which always seem to have an immediate mental effect on runners (I remembered seeing a runner immediately started walking the moment she touches the first grain of sand, like magic?). For me its my wildcard, generally, keep running & take small but constant strides & you can go quite fast on the loose sand. Strangely the sand part this year do not feel like 1.6km, maybe around 1.0-1.2km. Or maybe it just felt different due to a diversion of the usual route.

The trail part is still the same, fast shady dash to the finish with the all usual kids in the forest cheering ya on with distances left “too short” to be true.

Finished like 53:13.33, just 20 seconds faster than last year’s 53:36. But off way my aim of sub 50.. haiz.

Nevertheless a good run. 😎

Missed The Sgrunners event anniversary photo taking together with samuel & trackz when we went to take our barang barang… Dang should have informed TLR instead of reno or our absence.

Interesting events during the run:

Quote from brokenrunner:
“….i didn’t see any fainting ones. this shit-in-the-pants guy really made an impression. i didn’t see his face. but i can forever remember his back view…. brown in colour. …”

Yes, this year’s run seem to be rather ‘stinky’, mainly because of a runner who soiled his pants when running! You can detect his faint distinctive presence at many points around the run, but nothing can beat what brokie & me encountered at the siloso beach area, round the 7-8km mark:

A Chinese guy with white singlet top, commendably running at a relatively fast pace in that condition too, with brown stained stuff seeping though his white running top & some umm brown stuff dripping down his leg. You definitely can’t miss the sight, with the ever choking natural smell with always seem to be following you. Haha you can see a very large 5x3m gap behind him sia, very very funny. but still yucky… Which proved to be a very good motivational factor to overtake him & never let him OVERTAKE you again!

Interesting, interesting.

Post Race:
Hung out post race at siloso beach to chill out, played a little volleyball, despite being very rusty after one year from the sport. Otherwise there is frisbee. Heard the sgrunners are chlling out at tanjong beach, which is the other end of Sentosa, so didn’t join them in the end. Missed out on soccer & basket-football as I was too tried after the run to play. Nevertheless, the monkey’s ball game in the water proved to be one of the few group cohesive games, not to mention a not too physically demanding game for lazy bums like me.

Pohlong aka Alson came down midway during the day, who is ostracized most of the time. Haha, but the some of us did mentioned not being too hard on him as its just his nature haha, so as some get to know of him though his seemingly “open nature”. He actually wanted to chat, so found some time to have nice leisure talk with him at the end of the day where I got to know him better. Turns out hes like one of the few “fallen angels” as well, out of JC & into poly. Then we chatted about school & stuffs, with Yuan & Cockroach. Generally everyone judges a book by its cover, so don’t be too deceptive as it seems, he’s not that bad as it seems when you get to know him in person. Nevertheless he is still the only one with a free seat beside him on the crowded bus back.. 🙄

Oh yea, you can request a cert of the event through the online login page, which do not seem to be working either.

Mileage for the week (7 day period)
Sunset Way Canal Route 10km – Friday
New Balance RealRun, Sentosa 10km – Sunday
Total Mileage for week = 20.0km (67% of 30km/week target met)